Part 2 - Creating a custom OpenGL widget that will allow you to draw stuff.
- Download glfractal.h and glfractal.cpp into your
project directory. These files contain the code for the GLWidget.
- Create a new custom widget by going to Tools -> Custom -> Edit Custom
Widgets. Then click the New Widget button.
- Class Name: GLFractal
- Header: glfractal.h
After entering the above information, click Close.
- Looking at the toolbox in the Custom Widgets list you will notice a new widget button that
looks like
 and is labelled GLFractal.
This is your custome component.
Click this button and then click on your form to place it. Resize the GLFractal
widget to take up a sizeable amount of your form.
and is labelled GLFractal.
This is your custome component.
Click this button and then click on your form to place it. Resize the GLFractal
widget to take up a sizeable amount of your form.
- Add the code for GLFractal to your project by going to Project -> Add File
and selecting glfractal.h and glfractal.cpp.
- Save the entire project (save all).
- Create a new makefile by typing qmake easy.pro.
- Troubles?
- If you get the message error: mywidget.h: No such file or directory,
open up the file easyform.ui in a text editor (e.g., vi or emacs) and search
the file for mywidget.h text. Delete the line that this appears on (be sure
to delete closing tags if you delete opening tags) and save the file and exit
your editor. Now try the make command again.
- If you get a large number of error messages complaining about undefined
references to names prefixed with gl then there is a problem with the
OpenGL library. Usually this can be fixed in Designer by going to
Project -> Project Settings -> C++ Tab and adding -lGL next
to libs. This instruct qmake to include the OpenGL library when compiling.
Save and retry the qmake and make commands. If this doesn't work you may problems
with OpenGL not being installed.
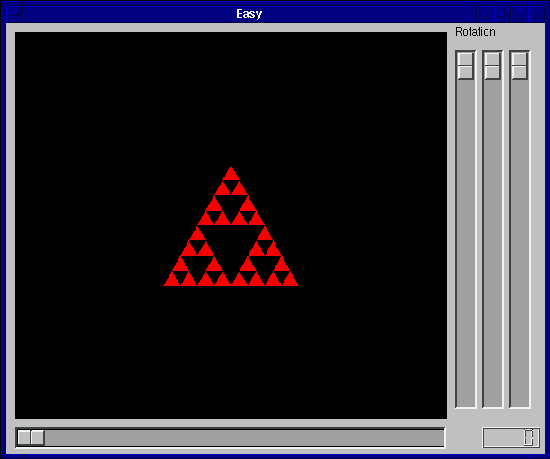
- Make and run your program. You should see something similar to this:
- Create slots for the custom component.
- Go to Tools -> Custom -> Edit Custom Widgets.
- In the list on the left hand side, select GLFractal. When you do this you
should see its information appear in the text boxes on right side of the dialog.
- Click the Slots tab.
- Click the New Slot button.
- In the slot text box replace "slot()" with "setXRotation(int)".
- Click the New Slot button and in the slot text box replace "slot()" with "setYRotation(int)".
- Click the New Slot button and in the slot text box replace "slot()" with "setZRotation(int)".
- Click the Close button.
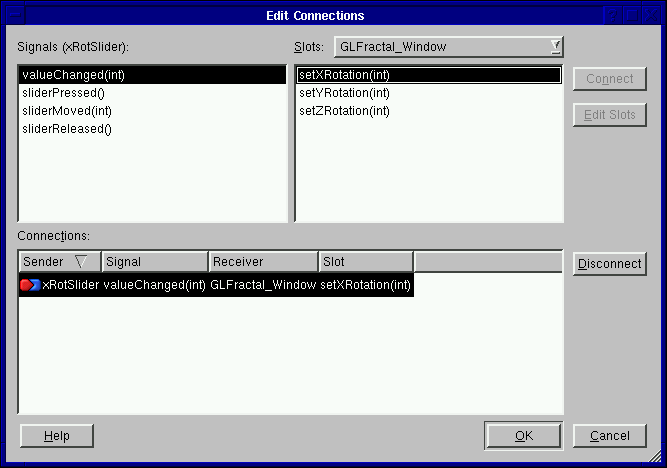
- Connect sliders' value changed signals to the rotation slots you have just created.
Do this the same way you did for the LCD/Slider event handler. Click the
signal/slot button
 , then click the slider you'd to control the
X axis rotation with and drag until you release on the GLFractal widget. This will bring up the
signal/slot connection dialog. Highlight valueChanged(int) for the slider signal, and select
setXRotation(int) for the GLFractal slot. You should end up with this:
, then click the slider you'd to control the
X axis rotation with and drag until you release on the GLFractal widget. This will bring up the
signal/slot connection dialog. Highlight valueChanged(int) for the slider signal, and select
setXRotation(int) for the GLFractal slot. You should end up with this:
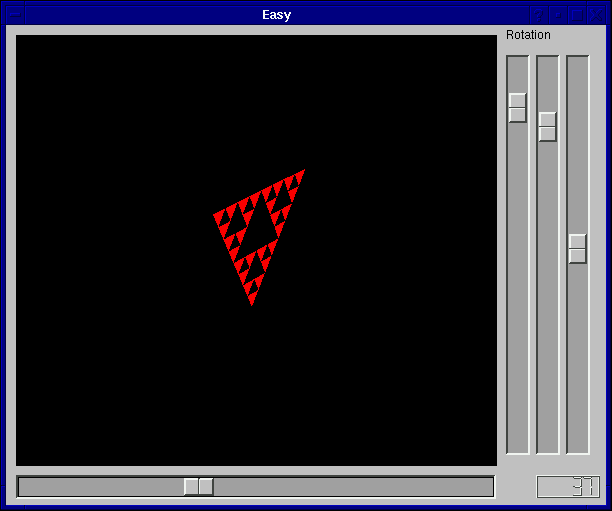
- Repeat the last step to connect the y rotation slider and the z rotation slider to the
setYRotation(int) and setZRotation(int) slots respectively.
- Change the maxValue property of your three rotation sliders from 99 to 360.
- Save your work then use make, and ./easy to re-compile and execute your program.
- You now have a program that looks like this:
Your Task
Your may have noticed that the zoom/scale slider still does nothing aside from making the LCD number change.
Your task is to create a slot called setScale(int) by editing glfractal.h and glfractal.cpp. Then you must
add this slot to your custom widget in designer. Finally connect the valueChanged(int) signal from your
zoom slider to the new setScale(int) slider.
FYI
If you wish to use the glu and glut libraries in your code (for functions that begin with "glu" like "gluOrtho( . . .)")
you have to explicitly tell QT to compile with these libraries. To do this go to Project -> Project Settings,
then click on the C++ Tab and type in -lglu and -lglut in the Libs text box. The tells qmake to compile with the
-lglut tag when it compiles/links/whatever.
Please email me at brosz at cpsc.ucalgary.ca if you have any questions or problems.
John Brosz, September 23, 2003
Slightly updated, January 2008.